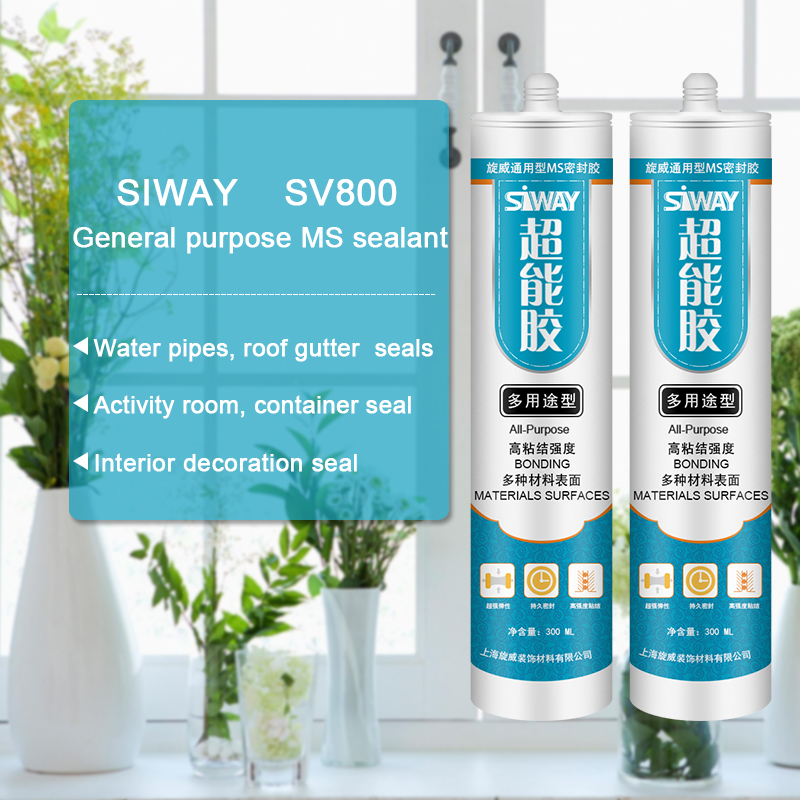
OEM Manufacturer SV-800 General purpose MS sealant for Nicaragua Factories

Short Description:
Description General purpose and low modulus MSALL sealant is a high quality, single component, paintable, anti-polluting neutral modified sealant based on silane-modified polyether polymers. The product does not contain solvents, no pollution to the environment, while most of the building materials, without primer, can produce superior adhesion. Product Features 〔1〕 environmental protection products: no solvent, no PVC, no isocyanate, non-toxic, tasteless, non-polluting, fast curing;...
The company upholds the philosophy of "Be No.1 in quality, be rooted on credit and trustworthiness for growth", will continue to serve old and new customers from home and overseas whole-heatedly for OEM Manufacturer SV-800 General purpose MS sealant for Nicaragua Factories, We always welcome new and old customers presents us with valuable advice and proposals for cooperation, let us grow and develop together, and to contribute to our community and staff!
Description
General purpose and low modulus MSALL sealant is a high quality, single component, paintable, anti-polluting neutral modified sealant based on silane-modified polyether polymers. The product does not contain solvents, no pollution to the environment, while most of the building materials, without primer, can produce superior adhesion.
Product Features
〔1〕 environmental protection products: no solvent, no PVC, no isocyanate, non-toxic, tasteless, non-polluting, fast curing;
[2] surface coating: compatible with most industrial paint, dry surface can be painted, so does not affect the curing speed;
[3] easy to use: excellent thixotropy and extrusion, for a wide temperature range.
〔4〕 good adhesion: the stone, aluminum, ceramics and cement components, and most of the building materials with excellent adhesion properties; no pollution of the porous material.
[5] excellent weather resistance, aging performance, superior tensile and compression resilience;
[6] neutral curing, stone, cement and other non-corrosive building materials, to overcome the common silicone rubber easy to contaminate the shortcomings of the substrate.
Basic use
General purpose and low modulus MSALL sealant Suitable for use:
[1] construction of housing and other areas of bonding and sealing;
[2] fixed panel, frame, window sill installation, suitable for a variety of building materials such as paint metal, glass, wood, concrete, stone, masonry and other ordinary seal;
[3] seam and ceiling seal;
[4] water pipes, roof gutter and other seals;
[5] activity room, container seal;
[6] interior decoration seal;
[7] mildew – suitable for kitchen and toilet applications;
〔8〕 the floor system of bonding, especially for housing renovation when the laying of tiles;
[9] on the porous material or smooth, moist surface has a strong adhesive force.
[10] Please note: MSALL sealant is not suitable for glass inlay use; for the prefabricated concrete displacement joint seal recommended supporting the use of Jiang special primer.
Technical data sheet
Color
White, black, grey
Package
300ml plastic cartridges
Shelf life
12 months
Note
If you want the TDS or MSDS or other details, please contact with our sales person.
Documenting how i replaced the intake manifold gasket on my 2003 Buick Century. I am not a professional. Please use this as reference only.
https://en.wikipedia.org/wiki/General_Motors_60%C2%B0_V6_engine#LG8
How to cast a reproduction concrete sink basin by making a 2-part Vytaflex urethane production rubber mold.
Step One: Construct Mold Box
Measure original sink basin. Use melamine board (formica coated) to make mold box segments, which will ensure easier separation from mold rubber.
Step Two: Create Spacer Board
Center model on board to use as a spacer board. Create perimeter outline for cutting. Center model on baseboard. Position spacer board and align with baseboard. Mark alignment point on baseboard and spacer board. Use modeling clay to create a gasket. Use non-sulfur based clay only. This will prevent rubber from going underneath model. Modeling clay will fill negative space between original model and spacer board. Remove excess clay.
Step Three: Acorn Nuts will be Used to Create Registration Keys
Hot melt glue will be used to secute acorn nuts. Place extra key for mold orientation.
Step Four: Assemble and Seal Mold Box
Screw melamine boards together with dray wall screws. Seal seams with hot melt glue.
Step Five: Release Mold Box and Model
Apply Universal Mold Release to all surfaces.
Step Six: Measure, Mix and Pour VytaFlex 40 Mold Rubber
VytaFlex 40 mix ratio: 1 part A to 1 part B by volume. Measure, mix, and pour the liquid rubber. Do not pour beyond sink hole. Let rubber cure for 16 hours at room temperature.
Step Seven: Prepare to Make Second Half of Mold
Use non-sulfur clay to fill in surface irregularities. Measure and cut reverse side baseboard. Secure reverse side baseboard. Turn over mold box. Remove original baseboard to expose concave half of model. Remove spacer board. Remove acorn nuts from rubber mold. Remove clay gasket. Remove clay residue.
Step Eight: Seal Drill Holes and Release Mold Box
Fill drill holes with non-sulfur clay. Seal seams with hot melt glue. Apply Universal Mold Release to all surfaces.
Step Nine: Measure, Mix and Pour VytaFlex 40 Mold Rubber
Let rubber cure for 16 hours at room temperature.
Step Ten: Demold Original Model
Remove mold box side walls. Gently pry original model to expose mold cavity. Concrete mold ready for casting.
Step Eleven: Casting Concrete
Apply In and Out II release agent to all surfaces. Secure 2-part mold with straps and baseboards. Place mold on vibration table. Fill mold with concrete and vibrate. Let concrete cure 24 hours.
Step Twelve: Demold Concrete Casting
A perfect concrete reproduction of the original. Concrete mold is ready to be cast again.
Make It Now! with Smooth-On
https://www.smooth-on.com/
https://www.facebook.com/SmoothOn
https://twitter.com/SmoothOn
https://www.google.com/+smoothon