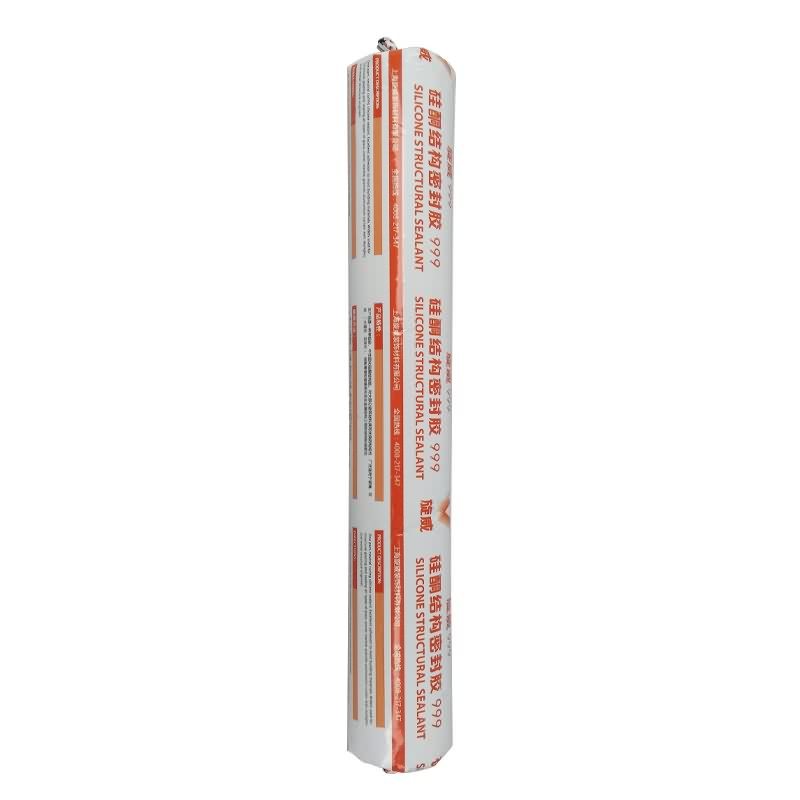
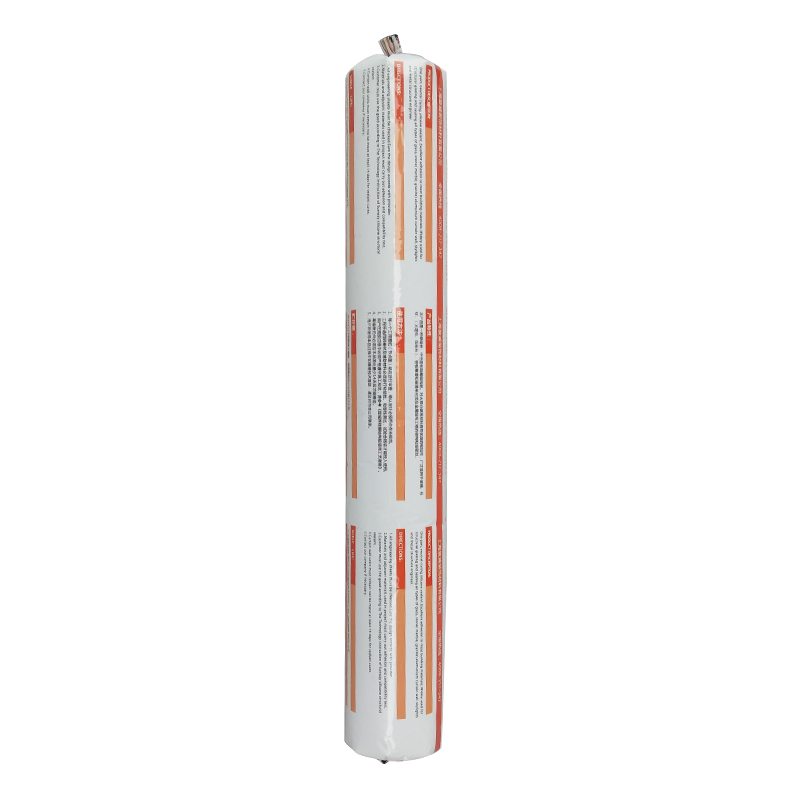
Factory selling SV-999 Structural Glazing Silicone Sealant to Bolivia Factories

Short Description:
Description SV – 999 silicone structural sealant is a one-component, neutral curing, designed for glass curtain wall, aluminum curtain wall, glass daylighting roof and metal structural engineering structural assembly silicone sealant. Show the effective physical properties and bonding performance Key Features 1. 100% silicone 2. No sag 3. Strong bonding strength 4. Water & weatherproof 5. Primerless adhesion to most building materials 6. 25% movement capability Basic Application...
Gaining customer satisfaction is our company's aim forever. We will make great efforts to develop new and top-quality products, meet your special requirements and provide you with pre-sale, on-sale and after-sale services for Factory selling SV-999 Structural Glazing Silicone Sealant to Bolivia Factories, We are confident to make great achievements in the future. We are looking forward to becoming one of your most reliable suppliers.
Description
SV – 999 silicone structural sealant is a one-component, neutral curing, designed for glass curtain wall, aluminum curtain wall, glass daylighting roof and metal structural engineering structural assembly silicone sealant. Show the effective physical properties and bonding performance
Key Features
1. 100% silicone
2. No sag
3. Strong bonding strength
4. Water & weatherproof
5. Primerless adhesion to most building materials
6. 25% movement capability
Basic Application
1.Glass curtain wall, aluminum curtain wall structure adhesive seal
2.Glass daylighting roof, metal structure engineering
3.Insulating glass bonding
Technical data sheet
| Test standard | Test project | Unit | value |
| Before curing——25℃,50%R.H. | |||
| specific gravity | g/ml | 1.40 | |
| GB13477 | Flow, sagging or vertical flow | mm | 0 |
| GB13477 | Operating time | min | 15 |
| GB13477 | surface drying time(25℃,50%R.H.) | min | 40-60 |
| Sealant curing speed and operating time will have different with different temperatures and temperature, high temperature and high humidity can make sealant curing speed faster, rather low temperature and low humidity are slower.21 days after curing——25℃,50%R.H. | |||
| GB13477 | Durometer Hardness | Shore A | 40 |
| The ultimate tensile strength | Mpa | 1.3 | |
| GB13477 | Tensile strength(23℃) | Mpa | 0.8 |
| GB13477 | Tensile strength(90℃) | Mpa | 0.5 |
| GB13477 | Tensile strength(-30℃) | Mpa | 0.9 |
| GB13477 | Tensile strength(flooding) | Mpa | 0.6 |
| GB13477 | Tensile strength(flooding – ultraviolet) | Mpa | 0.6 |
Certification
GB 16776;ASTM C1184
Color
Black
Package
300ml in cartridge * 24 per box, 500ml in sausage *20 per box
Shelf life
12 months
Note
If you want the TDS or MSDS or other details, please contact with our sales person.
You should check the valves at 500 – 600 miles, then every 6,000 miles after that.
Tools you’ll need:
10 mm socket
12 mm socket
Medium ratchet with short AND long extension
Big flat screwdriver or quarter
19 mm socket
Large ratchet
Flat feeler gauge
Torque wrench (one that works for low torques)
16 mm wrench (optional)
Need a Clymer manual? Check out https://www.clymer.com/ or https://www.youtube.com/user/ClymerManuals
Body work removal and installation: https://www.youtube.com/watch?v=Kki7S2RZBGQ
Remove the fan. The fan plug is mounted in a bracket on the frame – trace the wires, it’s easier than explaining. There are three 10 mm bolts. Two on the left and one near the center of the bike (right side of the fan) buried behind the radiator hose. The hose is pliable, push it out of your way. Use an extension. Unplugging the fan switch wire may also prove useful.
Marknet Valve Check / Adjustment Procedures: https://www.klr650.marknet.us/valves.html
I guess I lied. There is a link for the Clymers, but you still have to buy it: https://www.clymer.com/Book.aspx?bid=914&title=Kawasaki+KLR650%2c+1987-2006
Unplug the spark plug wire (leave the spark plug alone! What did it ever do to you?) and the temperature sending wire (right next to the spark plug). Remove the ignition coil. It has two wires going into the back, unplug them, then remove the 10 mm bolts holing it in place.
Remove the upper engine mount (I said I wasn’t going to to. *SPOILER ALERT* I tried to get the cover off for maybe 5 minutes to no avail. Then I gave in and took of the mount, the cover came out in about 10 seconds. Just do it). They are all 12 mm heads. Use the 16 mm wrench (not socket, like I said in the video… whoops.) to hold the plate “nut” from getting friendly with the engine.
Snip the wire ties. Get rid of the gas tank rubber doodads. Clean as much of the bike above the valve area as you can.
Take off the wire harness harness (two 10 mm bolts).
Remove the valve cover bolts, all four are 12 mm. The two on the right are straight forward. The back left takes some wire wiggling, and the front left takes a lot of wire wiggling. Store the bolts in a safe place in such a way that you know where they go when you need to put them back in. Mind their gaskets.
Valve stat sheet: https://www.klr650.marknet.us/valvclear.zip
Remove the valve cover from the left side of the bike. Be careful: the surfaces are precision machined, screw up and the chance of leaks goes up. BE GENTLE! Gentle like it’s your girlfriend / wife / whathaveyou.
Remove the two round plug on the left side of the engine. Use a big flat head screwdriver or a quarter. Use the 19 mm socket and large ratchet driver on the big hole and turn counterclockwise (the direction the wheels normally turn). There are three marks; you’re aiming for the third. It’s a straight tick mark with a T on right behind it. Watch the cam lobes. You’re at the “right” TDC (top dead center) when the tick mark by the T lines up with the lack of threads where the small cap goes AND the cam lobes all point away from each other. If you overshoot, take a breath, and spin the crank around TWICE. Watch the lobes if you’re wondering “why twice?”
Use a flat feeler gauge and check your valve shim clearances. Watch the video for the explanation.
Valve Shim Replacement: https://www.youtube.com/watch?v=R2d-V4udwaA
Use RTV Silicone Sealant and make a thin coat on both sides of the gasket. Put the gasket in place. Put the valve cover back in place from the left side of the bike. Again, BE GENTLE. You’ve made it this far, don’t fubar your precision machined surfaces now.
Replace the four cover bolts. Short on the left, long on the right. Tighten them evenly and carefully working your way up to 6 ft * lbs (that would be 71 INCH pounds).
Put the ignition coil back on, plug in the two wires on the back of it, plug in the temperature sending wire and put the spark plug cap back on the spark plug.
Put the fan back on (three bolts, 10 mm), plug it back in, put the plug back in its clip on the frame, plug the fan switch back in (bottom of the radiator).
Replace the wire ties that you snipped.
Replace the upper engine mount. All three bolts get torqued to 18 ft * lbs.
Replace the Body Work (link is up top).
Please rate and leave comments!
For a wealth of KLR 650 information, please visit KLR650.NET – Your Kawasaki KLR650 Resource!
If you decide to join, please use my referral link: https://www.klr650.net/forums/index.php?referrerid=17746
You can purchase this oil at Rainbow Loom’s webstore https://www.rainbowloom.com/product/silicone-oil-make-your-rubber-bands-last-longer-and-easier-to-loom-limit-2-per-order.html
New to Loomigurumi and wanting to know where to learn the basics click the link here https://www.youtube.com/watch?v=6a08icJ_p6Q
Learn how to search a channel’s video’s by using the playlists – https://www.youtube.com/watch?v=kZUxKhunLD8
Be sure to subscribe to my channel to be the first to see my new videos!
Learn how to make Rainbow Loom Action Figures and Charms. Tutorials also include hook only designs and Loomigurumi designs (which is crochet with Rainbow Loom bands), yarn crochet and Amigurumi tutorials as well as other crafty ideas.
Website : www.izzalicious.com
YouTube : https://www.youtube.com/user/izzaliciousdesigns?sub_confirmation=1
Instagram : https://www.instagram.com/izzaliciousdesigns
Facebook : https://www.facebook.com/IzzaliciousDesigns
Twitter : https://twitter.com/tashtashie
Pinterest : https://www.pinterest.com/tashtashie/
Some Store Discount Codes & Coupons
Michaels : https://www.chippmunk.com/michaels-coupons/#cp=izzaliciousdesigns
Hobby Lobby : https://www.chippmunk.com/hobby-lobby-coupons/#cp=izzaliciousdesigns
Jo-Ann’s : https://www.chippmunk.com/joanns-coupons/#cp=izzaliciousdesigns
Amazon : https://www.chippmunk.com/amazon-coupons/#cp=izzaliciousdesigns
Target : https://www.chippmunk.com/target-coupons/#cp=izzaliciousdesigns
Walmart : https://www.chippmunk.com/walmart-coupons/#cp=izzaliciousdesigns
Starbucks : https://www.chippmunk.com/starbucks-coupons/#cp=izzaliciousdesigns
Links to commonly used items utilised while making these videos
Rainbow Loom – https://go.magik.ly/r/izzaliciousdesigns/16335/
Rainbow Loom Bands – https://go.magik.ly/r/izzaliciousdesigns/16325/
Clover Soft Touch Crochet Hook – https://go.magik.ly/r/izzaliciousdesigns/16326/
Darice Pony Beads – https://go.magik.ly/r/izzaliciousdesigns/16328/
Crochet Stitch Markers – https://go.magik.ly/r/izzaliciousdesigns/16324/
Kirin Stores Loom Bands – https://go.magik.ly/r/izzaliciousdesigns/16336/
© Izzalicious Designs 2013 – 2016
All Rights Reserved
No part of this website or any of its design contents may be reproduced, copied, modified, translated or adapted, without the prior written consent of the author, unless otherwise complying with the requirements listed below. Designs by Izzalicious Designs are protected by the US Copyright Office and are NOT considered Open Source.
You may share this website and it’s contents by any of the following means:
1. Using any social media forum such as, but not limited to, Google, email, Blogger, Twitter, Instagram, Etsy, Facebook as long as you provide a back-link or the URL of the content you wish to disseminate; and
2. You may display photographs of creations you’ve made using these instructional video’s providing you credit the designer www.youtube.com/izzaliciousdesigns
For any other mode of sharing, please contact Izzalicious Designs at the email below kate@izzalicious.com
Commercial use and distribution of the contents of the website is not allowed without express and prior written consent of the designer.
(Translation : You can share and use all of this as long as you link back to my website/tutorial and give credit and as long as you contact me for permission and abide by my provisions you can sell the items too)