Factory Price For SV-311 Polyurethane Sealant for Construction to Victoria Factories
Short Description:
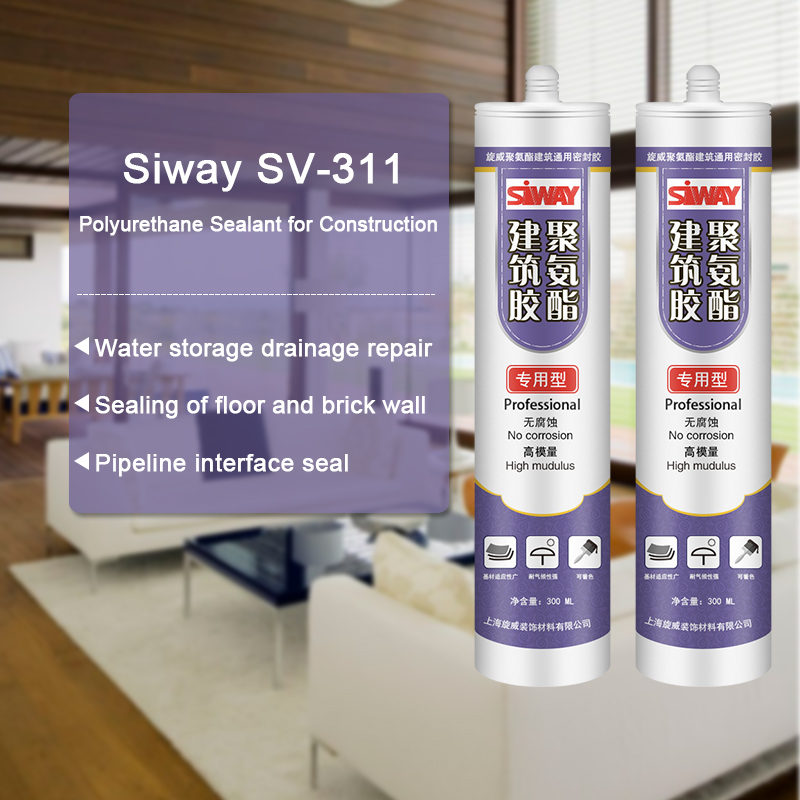
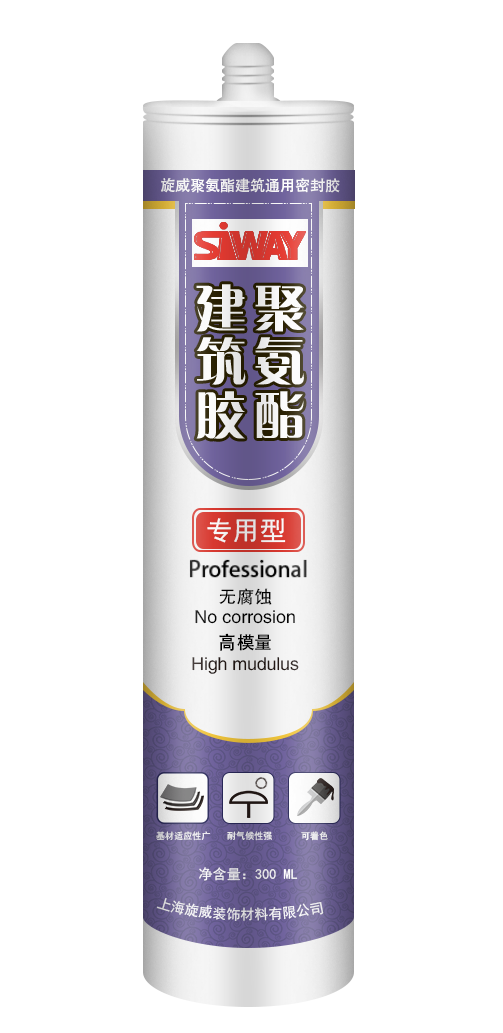
Description SV-311 is a one component polyurethane high modulus flexible sealant formulated as reliable bonding adhesive and joint sealant for construction industry, particularly where a higher modulus and lower movement capacity are required for joints with low or medium movement, e.g. connection joints between floor/stairs and wall, connection joints between floor and machinery, seam sealing / sealing of pipe ducts / ventilation systems, multipurpose joints in metal and wood construction w...
Assume full responsibility to meet all demands of our clients; achieve continuous advancements by promoting the growth of our clients; become the final permanent cooperative partner of clients and maximize the interests of clients for Factory Price For SV-311 Polyurethane Sealant for Construction to Victoria Factories, we are now looking forward to even greater cooperation with overseas customers based on mutual benefits. If you are interested in any of our products, please feel free to contact us for more details.
Description
SV-311 is a one component polyurethane high modulus flexible sealant formulated as reliable bonding adhesive and joint sealant for construction industry, particularly where a higher modulus and lower movement capacity are required for joints with low or medium movement, e.g. connection joints between floor/stairs and wall, connection joints between floor and machinery, seam sealing / sealing of pipe ducts / ventilation systems, multipurpose joints in metal and wood construction work.
Key Features
1. Non-sag consistency
2. Excellent adhesion to most common building materials
3. High tear strength
4. High tensile strength
5. Less fluid migration to porous material
Technical data sheet
| Test standard | Test project | Unit | value |
| GB13477 | density | g/m³ | 1.20±0.1 |
| GB13477 | Flow, sagging or vertical flow | mm | 0 |
| GB13477 | surface drying time(25℃,50%R.H.) | min | 30 |
| Curing speed | mm/24h | 3 | |
| GB13477 | Durometer Hardness | Shore A | 25-35 |
| GB13477 | 100% tensile strength | Mpa | ≤0.4 |
| GB13477 | The elastic recovery rate | % | 80 |
| Maximum seam width | mm | 35 | |
| Minimum seam width | mm | 8 |
Color
White, black, grey
Package
300ml plastic cartridges and 600ml in sausage
Shelf life
9 months
Note
If you want the TDS or MSDS or other details, please contact with our sales person.
You should check the valves at 500 – 600 miles, then every 6,000 miles after that.
Tools you’ll need:
10 mm socket
12 mm socket
Medium ratchet with short AND long extension
Big flat screwdriver or quarter
19 mm socket
Large ratchet
Flat feeler gauge
Torque wrench (one that works for low torques)
16 mm wrench (optional)
Need a Clymer manual? Check out https://www.clymer.com/ or https://www.youtube.com/user/ClymerManuals
Body work removal and installation: https://www.youtube.com/watch?v=Kki7S2RZBGQ
Remove the fan. The fan plug is mounted in a bracket on the frame – trace the wires, it’s easier than explaining. There are three 10 mm bolts. Two on the left and one near the center of the bike (right side of the fan) buried behind the radiator hose. The hose is pliable, push it out of your way. Use an extension. Unplugging the fan switch wire may also prove useful.
Marknet Valve Check / Adjustment Procedures: https://www.klr650.marknet.us/valves.html
I guess I lied. There is a link for the Clymers, but you still have to buy it: https://www.clymer.com/Book.aspx?bid=914&title=Kawasaki+KLR650%2c+1987-2006
Unplug the spark plug wire (leave the spark plug alone! What did it ever do to you?) and the temperature sending wire (right next to the spark plug). Remove the ignition coil. It has two wires going into the back, unplug them, then remove the 10 mm bolts holing it in place.
Remove the upper engine mount (I said I wasn’t going to to. *SPOILER ALERT* I tried to get the cover off for maybe 5 minutes to no avail. Then I gave in and took of the mount, the cover came out in about 10 seconds. Just do it). They are all 12 mm heads. Use the 16 mm wrench (not socket, like I said in the video… whoops.) to hold the plate “nut” from getting friendly with the engine.
Snip the wire ties. Get rid of the gas tank rubber doodads. Clean as much of the bike above the valve area as you can.
Take off the wire harness harness (two 10 mm bolts).
Remove the valve cover bolts, all four are 12 mm. The two on the right are straight forward. The back left takes some wire wiggling, and the front left takes a lot of wire wiggling. Store the bolts in a safe place in such a way that you know where they go when you need to put them back in. Mind their gaskets.
Valve stat sheet: https://www.klr650.marknet.us/valvclear.zip
Remove the valve cover from the left side of the bike. Be careful: the surfaces are precision machined, screw up and the chance of leaks goes up. BE GENTLE! Gentle like it’s your girlfriend / wife / whathaveyou.
Remove the two round plug on the left side of the engine. Use a big flat head screwdriver or a quarter. Use the 19 mm socket and large ratchet driver on the big hole and turn counterclockwise (the direction the wheels normally turn). There are three marks; you’re aiming for the third. It’s a straight tick mark with a T on right behind it. Watch the cam lobes. You’re at the “right” TDC (top dead center) when the tick mark by the T lines up with the lack of threads where the small cap goes AND the cam lobes all point away from each other. If you overshoot, take a breath, and spin the crank around TWICE. Watch the lobes if you’re wondering “why twice?”
Use a flat feeler gauge and check your valve shim clearances. Watch the video for the explanation.
Valve Shim Replacement: https://www.youtube.com/watch?v=R2d-V4udwaA
Use RTV Silicone Sealant and make a thin coat on both sides of the gasket. Put the gasket in place. Put the valve cover back in place from the left side of the bike. Again, BE GENTLE. You’ve made it this far, don’t fubar your precision machined surfaces now.
Replace the four cover bolts. Short on the left, long on the right. Tighten them evenly and carefully working your way up to 6 ft * lbs (that would be 71 INCH pounds).
Put the ignition coil back on, plug in the two wires on the back of it, plug in the temperature sending wire and put the spark plug cap back on the spark plug.
Put the fan back on (three bolts, 10 mm), plug it back in, put the plug back in its clip on the frame, plug the fan switch back in (bottom of the radiator).
Replace the wire ties that you snipped.
Replace the upper engine mount. All three bolts get torqued to 18 ft * lbs.
Replace the Body Work (link is up top).
Please rate and leave comments!
For a wealth of KLR 650 information, please visit KLR650.NET – Your Kawasaki KLR650 Resource!
If you decide to join, please use my referral link: https://www.klr650.net/forums/index.php?referrerid=17746
In this video I go over the five things I love about my 2017 Audi S3 Sedan US Spec.
➥ Get $7 off MyPetrolBox use coupon code “WRENCHON” https://mypetrolbox.com
➥ Get 20% off TUNER CRATE using code “WRENCHON”: https://bit.ly/28W8UvW
➥ Blake’s Garage T-Shirts: https://Blakesgarage.bigcartel.com
$600 Brembo Brake upgrade
➥ACDelco 172-2587 GM Original Equipment Front Passenger Side Disc Brake Caliper Assembly https://amzn.to/1SrwQI0 $86.06
➥ACDelco 172-2586 GM Original Equipment Front Driver Side Disc Brake Caliper Assembly https://amzn.to/1U460oz $81.17
➥ACDelco 18K1971X Professional Front Disc Brake Caliper Hardware Kit https://amzn.to/1Srx2qU $17.51
➥StopTech 125.47019 Premium Brake Rotor https://amzn.to/1VzQhPb $70.39 + $12.99 Shipping X 2 = 166.76
➥ACDelco 17D1050M Professional Semi-Metallic Front Disc Brake Pad Set https://amzn.to/1VzRGoT $34.69
➥https://www.ctsvbrakeswap.com $220.00
Car Products I use:
➥Chemical Guys EcoSmart-RU https://amzn.to/2bp2bJv
➥Chemical Guy Hybrid V7 Optical High Gloss Spray https://amzn.to/2aQr5Qe
➥Chemical Guys Diablo Gel Wheel and Rim Cleaner https://amzn.to/2bf8CSr
➥CarPro Reload Sealant Spray https://amzn.to/2aRpZ6l
➥CarPro PERL Coat Plastic & Rubber https://amzn.to/2b2iqNQ
➥Durafoam Contoured Large Tire Dressing Applicator https://amzn.to/2b2iIEt
➥Chemical Guys Lava Luminous Glow Infusion WAX https://amzn.to/2aRpvwN
➥Chemical Guys Light Duty Clay Bar and Luber Synthetic Lubricant Kit
https://amzn.to/2bp2XX7
Camera Gear I use:
➥ Canon 70D https://amzn.to/1Sp5ZeA
➥ Canon 17-40mm F/4 Lens https://amzn.to/1Py9ER5
➥ Rode Video Mic Go https://amzn.to/1Py9IQE
➥ GoPro Hero 3 Black https://amzn.to/1Sp6jdb
➥ Manfrotto 502 video head here https://amzn.to/1VYc97G
➥ Rode Video Mic Go https://amzn.to/1Py9IQE
➥ Zoom H1 Handy Portable Digital Recorder https://amzn.to/1SQh72t
➥ Lapel Mic HUACAM YYPJ-01-1 https://amzn.to/1SQhfyQ
➥ ProMaster XC525 Red Tripod With Head https://amzn.to/1roNPyN
Channel Art by Synq DZN Check out his Channel
➥ https://www.youtube.com/user/Improvings
➥ https://plus.google.com/+AkzMC/