19 Years manufacturer Siway PU FOAM Export to Amsterdam

Short Description:
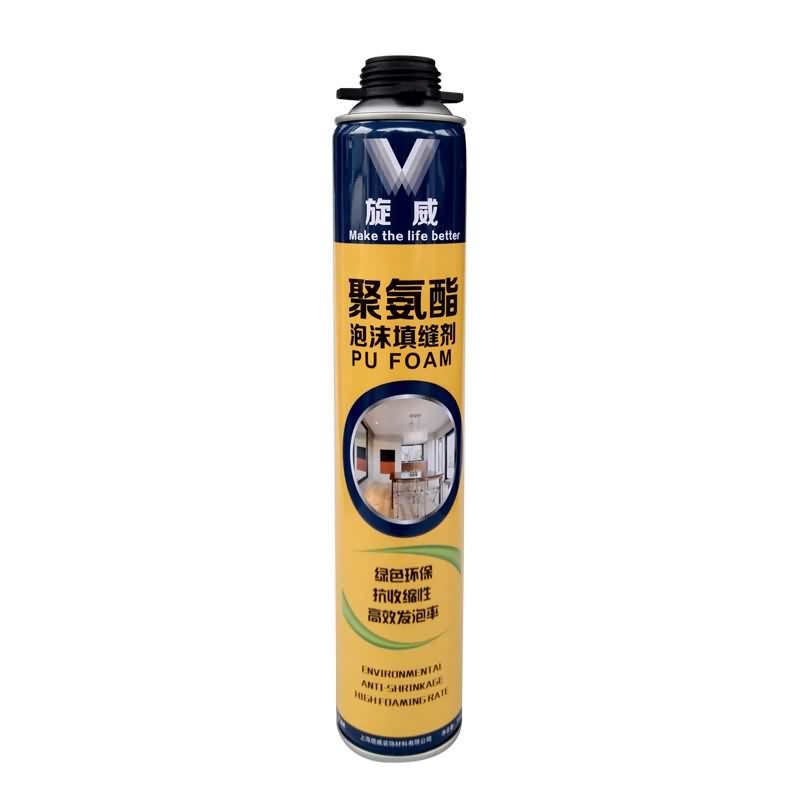
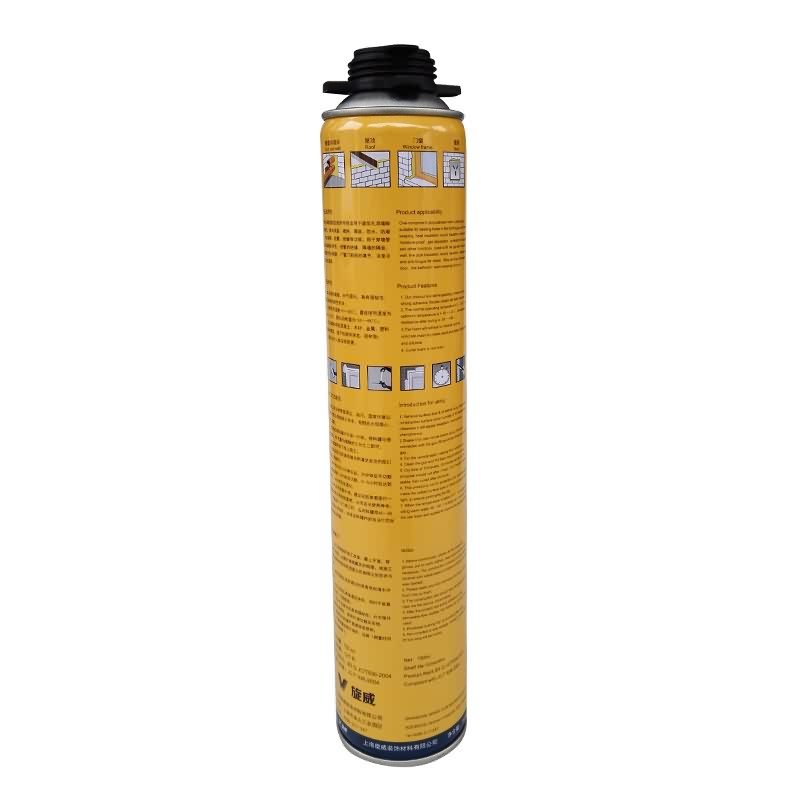
Description This product is the expansion, moisture curing, has the strong cohesiveness, elastic foam obturator structure; Save work to save time, reduce waste; High bond strength; Bubble can stick in the concrete, wood, metal, plastic, such as base material surface, but not including teflon, silicon resins; Key Features 1. Noise silencing effect 2. Strong bonding strength 3. Water & weatherproof 4. Primerless adhesion to most building materials Basic Application 1.Doors and Windows a...
continue to improve, to ensure product quality in line with market and customer standard requirements. Our company has a quality assurance system have been established for 19 Years manufacturer Siway PU FOAM Export to Amsterdam, winning customers' trust is the gold key to our success! If you are interested in our products, please feel free to visit our web site or contact us.
Description
This product is the expansion, moisture curing, has the strong cohesiveness, elastic foam obturator structure; Save work to save time, reduce waste; High bond strength;
Bubble can stick in the concrete, wood, metal, plastic, such as base material surface, but not including teflon, silicon resins;
Key Features
1. Noise silencing effect
2. Strong bonding strength
3. Water & weatherproof
4. Primerless adhesion to most building materials
Basic Application
1.Doors and Windows and wall body between the gap filling sealing, fixed bond
2.Language lab, studio, etc when decorating, gap to fill
Technical data sheet
|
Project |
Value |
||
|
Density, Kg/m³,Not less |
10 |
||
|
Thermal conductivity,35℃,W/(m·K) no more than |
0.050 |
||
|
Dimensional stability(23±2)℃,48,h no more than |
5 |
||
|
Operating temperature |
-10~+35℃ |
||
|
Optimum operating temperature |
+18~+25℃ |
||
|
Temperature range(After curing) |
-35~+80℃ |
||
|
Tensile bond strength kPa Not less |
Aluminum plate |
Standard condition,7d |
80 |
|
Immersion,7d |
60 |
||
|
PVC plate |
Standard condition,7d |
80 |
|
|
Immersion,7d |
60 |
||
|
Cement Plate |
Standard condition,7d |
60 |
|
|
Shear strength,kpa,Not less |
80 |
||
|
Foam expansion ratio,Not less |
Standard value-10 |
||
Certification
JC 936-2004
Color
White
Package
750ml in Bottle * 12 per box
Shelf life
12 months
Note
If you want the TDS or MSDS or other details, please contact with our sales person.
https://www.wagneraustralia.com.au/ Wagner – Paint Smart
This is a quick demo of a HeavyCoat unit spraying high viscosity waterproofing membrane.
The powerful range of HeavyCoat hydraulic piston pumps have been specially developed for working with high viscosity, aggressive and abrasive materials. They are characterised by their large flow passages and high suction power which also allows them to be used with multiple guns, on large projects.
For more info on the HeavyCoat range, follow the link: https://bit.ly/1pQNdNv
Create your own molds in a very inexpensive way, with only corn starch and silicone. The silicone caulk must be 100% silicone and clear for it to work properly.
Depending on how thick your mold is, it could take only a few minutes to about an hour to dry and be ready for casting. To cast, I use jewelry resin, but I’m sure you can also use plaster or clay. I have not yet tried making 3 dimensional molds, but I’m sure the process is not difficult, just a little more time consuming.
To do this, you might want to try separating your object into 2 or more sections with something like thin plastic sheets or cardboard. Then applying the silicon to each section, letting it dry and then separating your mold from the object. Put the mold pieces together and make sure they stay securely in place and aligned to one another by using rubber bands. Pour your casting material through a hole that you created during mold making or afterwards. Let it dry.
These instructions for 3 dimensional mold making are really just my guess and how I would go about it. If you have a better way or find an awesome video, let me know! I’d like to try it out too.