14 Years Manufacturer Siway two component strength-basded ceramic tile sealant for Adelaide Manufacturers
Short Description:
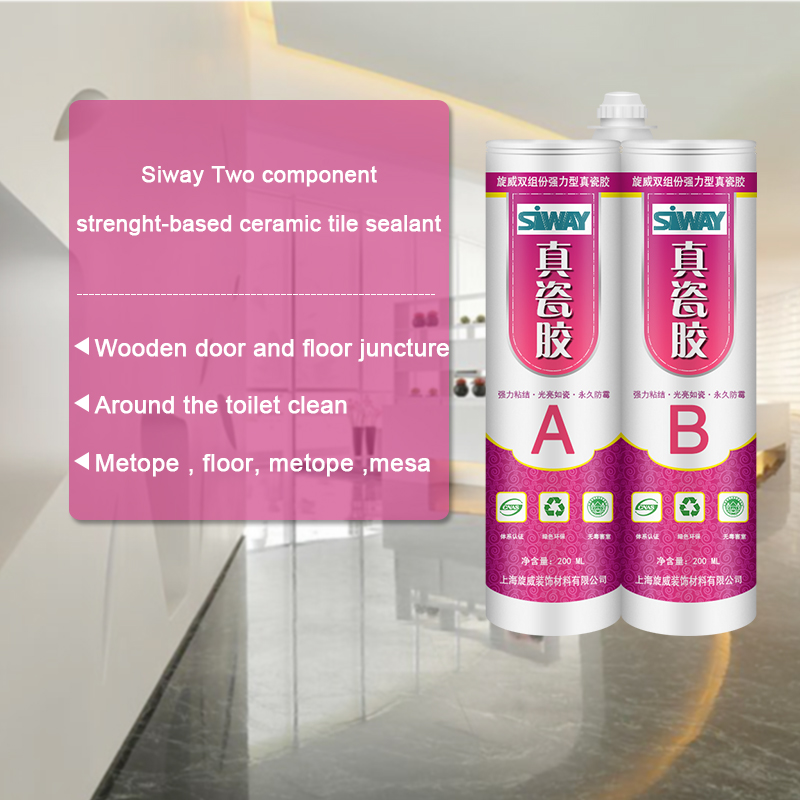
Product introduction Siway two component strength-basded ceramic tile sealant is an upgraded version of epoxy common beauty gap sealant, excellent toughness and impact resistance, surface brightness, such as porcelain, efficient, durable antibacterial mouldproof, waterproof sealing, 100% do not flow, construction simple, harmful index is far lower than the standard “GB18583-2008″ interior decoration, etc. Is widely used in high-grade kitchen, sanitary ware, high-grade family is de...
Our target is to consolidate and improve the quality and service of existing products, meanwhile constantly develop new products to meet different customers' demands for 14 Years Manufacturer Siway two component strength-basded ceramic tile sealant for Adelaide Manufacturers, Our aim is "blazing new ground, Passing Value", in the future, we sincerely invite you to grow up with us and make a bright future together!
Product introduction
Siway two component strength-basded ceramic tile sealant is an upgraded version of epoxy common beauty gap sealant, excellent toughness and impact resistance, surface brightness, such as porcelain, efficient, durable antibacterial mouldproof, waterproof sealing, 100% do not flow, construction simple, harmful index is far lower than the standard “GB18583-2008″ interior decoration, etc. Is widely used in high-grade kitchen, sanitary ware, high-grade family is decorated in joint seal and hotel decoration,, without excitant or unpleasant smell, in use process to bring you new construction concept and aesthetic effect.
Note: the position of construction
1, metope and floor, metope and mesa, and side beams and floor juncture
2, square face plate around the seams with mesa
Around 3, round face and mesa juncture, circular beams and floor juncture
4, around the toilet clean and floor juncture
5, wooden door and floor juncture
In 6, the tub edge or metope seams with mesa
Scope of application
1, window, furniture and so on, all kinds of counter aperture, cabinets, all kinds of edges, kitchen toilet all kinds of edges, can also be used to paste all kinds of hard materials.
In 2, the guesthouse, hotel, family bath crock, implement, sink, shower room and xiancai basins of installation, waterproof, plugging and other kitchen ware and decorative processing.
Method of use
1, clean the construction surface, remove dirt, oil and other impurities, then along the hem the ceramic tile with crepe paper.
2, mount rubber mouth, combined with glue gun, glue mouth mouth before the glue to glue on the glue, the glue liquid located in cement mix, edging out front a small amount of adhesive solution, in order to avoid mixed uneven, lead to not curable, and then into the ceramic tile aperture.
3, scrape to evenness with blade, slight trim the edges.
4, this product operation time 30 minutes, 4-6 hours at 25 ℃ room temperature curing, 24 hours of maximum intensity.
Making a Cavity Pour Mold with Mold Max 30 RTV Silicone Rubber from Smooth-On.
Our model is a hand-carved hard wood 3-dimensional figure. Drill an air release hole in to the middle of a baseboard. Secure model to baseboard with screws. Apply plastic wrap to the original model to protect the surface. Cover the model with 1/2-inch (1.3 cm) clay blanket. Create a 2-inch (5.1 cm) flange for registration. Build a 3-inch (7.6 cm) clay dividing wall and apply clay supports. Drill indentations in the baseboard to register shell. Build a clay pour spout and a 1/2-inch clay dam. Apply Sonite Wax to baseboard and then apply Ease Release 200 to the entire surface.
Measure and mix duoMatrix NEO with a mix ratio of 2A:1B. Combine parts and mix thoroughly. For the first layer, apply a detail coat to the first half. Measure and mix duoMatrix NEO with chopped fiber. Apply this as the second layer. Apply a third layer of duoMatrix NEO without chopped fiber. A wood support leg is attached using duoMatrix NEO. Let cure for one hour.
Once the NEO has cured, remove the dividing wall. Drill indentations into shell for registration. Build a clay dam and pour spout. Apply Sonite Wax to baseboard and exposed shell and then apply Ease Release 200 to the entire surface. Measure and mix NEO for the second half of the support shell, following the same procedure used to create the first half. Again, a wood support leg is attached using NEO and the shell is allowed to cure one hour at room temperature. A rasp is used to create a smooth flange edge, and then three holes are drilled through the support shell. Bolts will help secure the support shell during casting.
Demold the support shell halves, remove the plastic wrap from the model, and then remove clay from the support shell. Create vent holes in support shell to allow air to escape. A 1/4-inch (6 mm) drill bit is used to drill holes through the support shell for a total of six air vents. Apply release agent to both the model and support shell. Register the support shell over the model and secure. Use bolts to hold the support shell halves together. Drywall screws are used to secure the support shell to the baseboard. Seal all seams with a hot glue gun. Place drinking straws into pre-drilled holes for air release, using clay to help secure and seal the straw. Only 1/4-inch of the straw will go into the support shell. IMPORTANT: Do not allow the drinking straws to touch the model. Trim the top two straws for easier access to the pour spout.
Measure and mix Mold Max 30 silicone rubber. Then vacuum the Mold Max 30. After vacuuming, pour Mold Max 30 into the pour spout. Cap the top of the straws with clay to stop the flow of rubber, saving material. Continue to pour rubber until the cavity is filled. Let Mold Max 30 rubber cure for 16 hours at room temperature. Once cured, remove the support shell and rubber mold from the model. Perfect detail is captured from the original model.
How to cast into the mold:
The mold is first primed with auto body primer. Smooth-Cast 300 liquid plastic is measured, mixed, and poured into the mold. After three minutes, the liquid plastic turns to a solid. Let Smooth-Cast 300 cure for 10 minutes at room temperature. Remove the support shell and demold casting. A perfect reproduction! The casting is ready to be painted.
Make It Now! with Smooth-On
https://www.smooth-on.com/
https://www.facebook.com/SmoothOn
https://twitter.com/SmoothOn
https://www.google.com/+smoothon
Hi Temp Self-Fusing Silicone Rubber Tape suitable for emergency repair.


